


Functional Exposure Triangle (FET) - The Practical Way of Seeing Exposure Triangle
pypaiphoto.com / Py Pai, Los Angeles, CA
For decades, we have been using a basic "Exposure Triangle" chart (see below) to describe the basic relationship of aperture, shutter speed, and ISO sensitivity. It's how I used it to learn photography. However, it's good in concept, but lacking in practical applications:
- it tells a triangular relationship between aperture, shutter speed, and ISO sensitivity.
- it does not give an approximate idea to visualize the effect of each setting
- it does show various styles and types of photography have different setting combinations
- it's too abstract

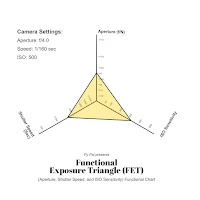
I've created a new "radar chart" for the same concept, called "Functional Exposure Triangle", with schematic markings to show the actual camera settings and their visualized effects.
Visualize and Profile The Exposure Triangle Concept Through Functional Exposure Triangle (FET)
With the markings of settings and their visual representations of captured light, FET can help photographers in many different ways:
- demonstrates the relationships between aperture, shutter speed, and ISO sensitivity number
- illustrates that each setting is actually a logarithmic instead of linear increment on numbers
- instantly displays graphical representation of the volume of lights hitting the camera sensor
- shows the effects of different settings, such as higher bokeh by wider aperture
- each photo can be profiled to show their characteristics, such as wide aperture, slow shutter speed,...
- it's easy to demonstrate various shooting profiles, as most cameras follow similar markings of aperture, shutter speed, and ISO numbers
- it's also easy for changing settings during light testing of a given lighting condition
- The FET chart can also be applied to any lighting conditions that does not affected by pulse lighting (flash, strobe, speedlight)
- FET also works with ND filter or additional light modifiers such as reflectors, scrims, or others
- FET can also be used in video with or without additional continuous light
The Basic Concept of Functional Exposure Triangle (FET)
The basics of the FET is,
- it's for a continuous lighting environment, such as sun light, ambient light, light through light modifiers (reflector, ND filter,...), or a window shop's light
- it cannot be used while a pulse lighting is introduced, such as a flash, strobe, speedlight
- a bigger triangle means a wider aperture, or lower speed, or higher ISO sensitivity ideal for a low light environment (lower luminosity)
- a smaller triangle means a smaller aperture, or faster speed, or lower ISO sensitivity, ideal for bright sun with lots of light (higher luminosity)
- this can be used in both first approximation and following setting and/or lighting adjustments
How to Use The Functional Exposure Triangle (FET)
The step to use FET is as follows:
- choose a first aperture, speed, and ISO settings based on the rough guess of the lighting condition
- raise the aperture (open wider), increase shutter speed (more time), or increase the ISO number (more sensitive) to expand the triangle area, to obtain more light, if under-exposed.
- reverse the approach if it is over-exposed.
- at the same time, you can drag the three points to the desired effects (bokeh, motion blur, pushing for more light)
Various FET Profile Examples
Here are a few examples that demonstrate the characteristics of various FET shapes:

This is the basic form to create various FET charts
During a light test:
Underexposed: f/5.0, 1/125, 100


Overexposed: f/4.0, 1/160, 500


Properly exposed: f/4, 1/160, 250


0 Comments
Leave your comment: